Welcome to the fourth chapter of our Beginner’s Guide to SharePoint.
The Vissensa team are answering the most commonly asked SharePoint questions which we’ll be sharing with you in a series of guides – just like this one!
Part 1: What is SharePoint and how can it benefit my business?
Part 2: SharePoint Set Up and Migration
Part 3: What are SharePoint Sites, Pages and Web Parts?
In this guide we’ll be looking at how to manage your files and folders in SharePoint. We’ll cover everything from how to create a new folder in a SharePoint site, to how to recover a deleted SharePoint file, and everything in between!

How to manage files and folders within SharePoint?
SharePoint is great for managing your files and folders that makes them easy to access and share. It provides users with familiar windows-based tools for organising and storing files within a directory structure made up of folders. Unlike traditional shared folders, SharePoint stores everything within a shareable intranet site, increasing file accessibility and usability for both local and remote users.
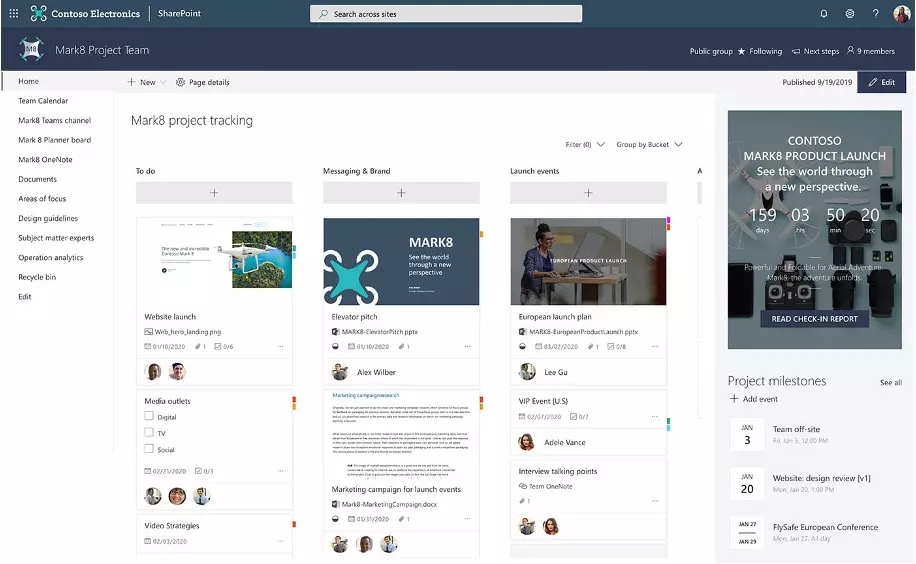
Organising files within an intranet site greatly improves user experience by making it easier to find documents and files, as well as providing a central portal for to-do lists, recently updated files, and upcoming events. The example above shows how a SharePoint Online structured web page and imagery can make it easier for users to navigate to the folders they need or to a particular part of the site.

Once selected, folders within that particular site are shown on the left hand side (as shown below) or, if your department has set it up, in the main central section of the portal.
How to create folders in SharePoint?
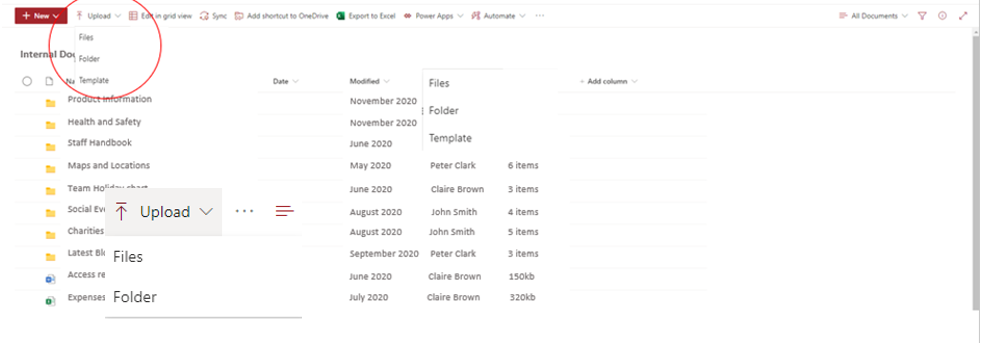
There are three ways to create folders in SharePoint: creating a new folder from within a site, uploading existing documents from a user’s shared drive, or creating a new folder when saving a file, like a Word document.
Creating a new folder from within a Site
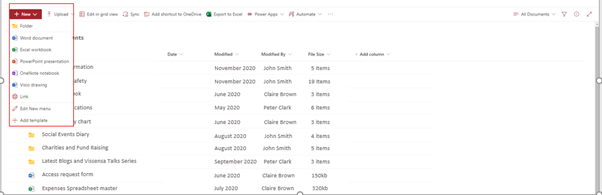
Start by navigating to the page on your site where you want the new folder to be stored. Select “New” and then select “Folder” from the SharePoint menu at the top of the page. Enter the folder name in the “Create a Folder” pop-up box.
Once your folder is created, it can be opened and you can add documents and files to it, just like you would in a traditional folder.
To add a new document to the folder from within SharePoint, click “New”, and instead of “Folder”, simply select the type of document you want to create.
Uploading Existing Folders from a User’s Shared Drive
The second way to create a folder in SharePoint is by uploading existing documents from a user’s shared drive using the “Upload” tab at the top of the SharePoint menu. This allows the upload of single files, or complete folders, to the folder selected on the SharePoint site.
Saving files directly to SharePoint
You can create a library of documents in SharePoint by uploading them at the point a new document is being saved. Instead of saving it locally, Microsoft provides the functionality for the document to be uploaded directly to SharePoint and saved in the folder of choice.
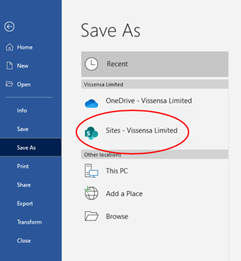
In the above example, the frequently used SharePoint sites are displayed. Following the selection of one of these folders, the folder will be opened ready to accept the new document as shown below.
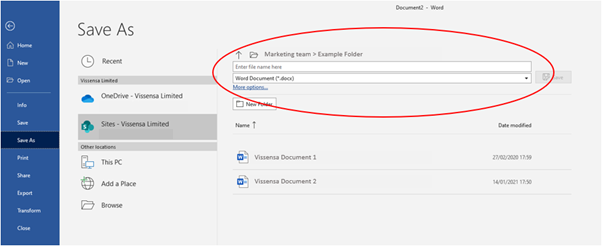
Once the file name had been entered in the box highlighted above, the file will be uploaded to the SharePoint site and immediately available for co-workers to view – a major difference between storing files in SharePoint and OneDrive.
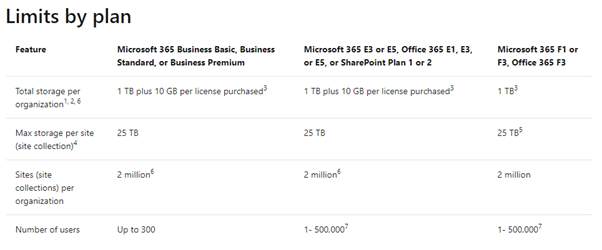
How much storage space do I have in SharePoint?
The SharePoint storage quota with Microsoft 365 available to your organisation is based on the Microsoft License Plan that is in place and the number of users. Generally, SME’s will fall into the model of 1TB of storage plus 10GB for each user license purchased. Additional storage can be purchased to a maximum size in each SharePoint site of 25TB.
Note: these figures may change so it’s worth regularly checking Microsoft’s SharePoint limits directly.
The link above provides the limits available under SharePoint and some other limitations that come with the service. The current licensing [May 2021] looks like this:
How SharePoint can help your team members collaborate on documents (version control, history, view / download records, etc.)
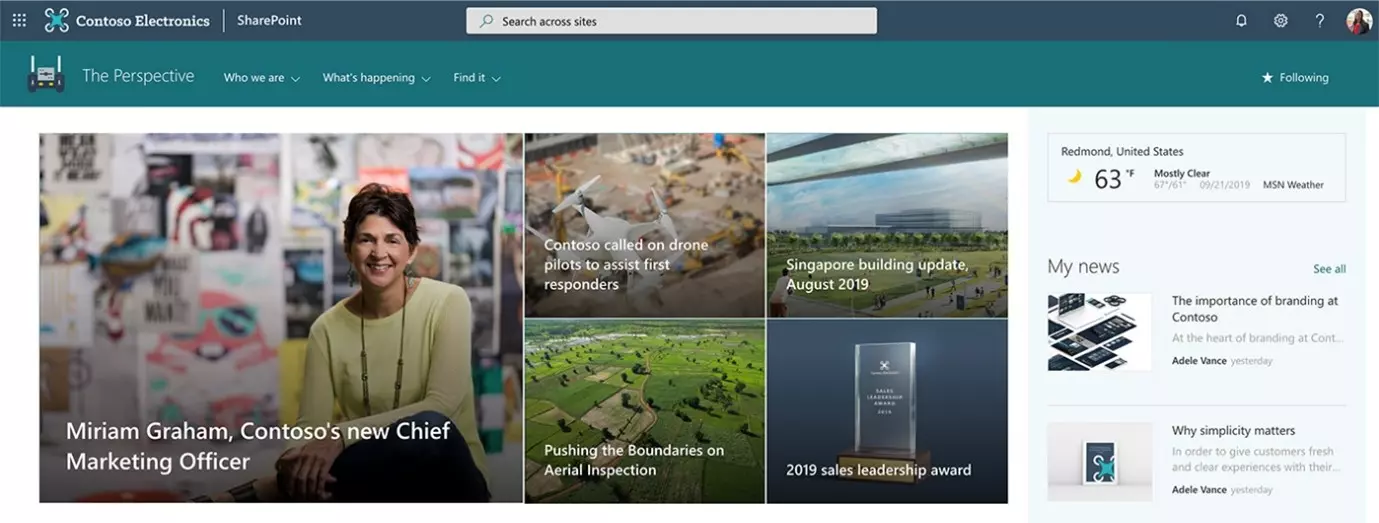
SharePoint is the ideal platform to enable staff to collaborate with each other including through the use of Microsoft Teams, be that in the same location or across the world. SharePoint sites are configurable to each organisation’s requirements, and allow all users to easily upload, download, access and share files types that are compatible with many internet browsers and File Explorers.
SharePoint has been designed with visibility and simplicity in mind so the site can have pictures representing the different departments or projects as shown in the example below.
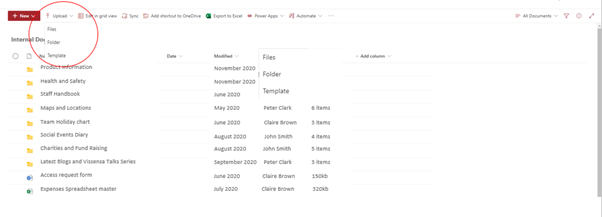
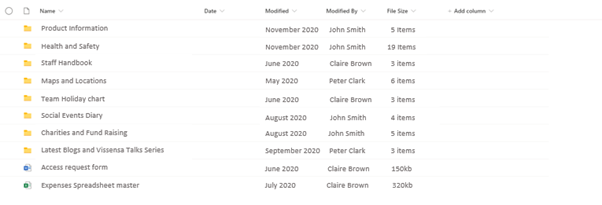
Once a top level selection has been made, the file structure looks the same as the familiar Windows file structure. From this view the last user to modify the document is identified, including the date the modification was made and the file size.
Unlike File Explorer in Windows or OneDrive, SharePoint automatically versions documents that have been amended and keeps track of these versions should you wish to return to a previous iteration.
To view the versions available, as well as who has amended them and when, you can click on the three dots at the end of the SharePoint menu bar to reveal more functions that are specific to the control of documents. One of these options is Version history. Selecting this option will display all versions of a document held within the SharePoint folder structure!
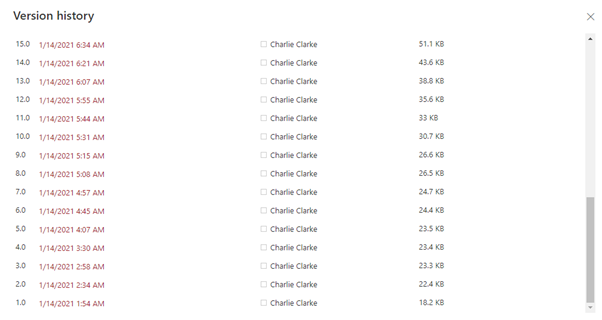
By hovering over a specific version, further options (including the ability to restore the selected version) is available.
What content or file types are compatible with SharePoint?
At present there are no restrictions on the types of files you can add to SharePoint.
There are a few file types that you can upload, but may not work unless your particular site allows you to run some form of custom script. By default, running custom script is blocked on user-created sites that have Microsoft 365 groups. A change can be made by your Global Admin or SharePoint administrator at your organisation, to allow or prevent customer script from being performed.
Uploading files to SharePoint
Many users already have shared drives and folders full of important documents that they want to share with their colleagues, therefore uploading these to SharePoint is the quickest way to populate a SharePoint site with the files and folders needed to collaborate.
To do this, an upload feature exists in SharePoint. Once selected, a menu is presented with the options to upload a individual file or a complete folder to the selected folder in SharePoint.
The action of selecting a folder or a file will open a Windows Explorer pane which will look very familiar to Windows users as it is the exact method used to save files on individual drives and folders.
Typing a file name, or clicking over the name of the file required, will populate the file name dialogue box and selecting “Open” will create a copy of the file in SharePoint within the chosen folder.
Moving files and folders in SharePoint
Moving files and folders in SharePoint is as easy as it is in Windows Explorer. The move and copy function for files and folders is selected from the main SharePoint menu bar:

Once the Move option is selected, the available SharePoint or external resources are show in the ‘places’ menu.
Note: the ability to move items to your own OneDrive directly from this menu is available if you have set your OneDrive up correctly, and it is registered to the same user account as your SharePoint site.
Moving files to external resources will remove them from the visibility of your colleagues, as well as any SharePoint function such as versioning – but is useful if you know you are not going to be able to connect to the SharePoint site and need a file to work on (for example, a PowerPoint Presentation you are giving externally or at a conference where you can’t be sure the connection over the internet to SharePoint will be good enough).
How often does SharePoint sync and where are my files backed up?
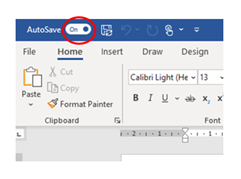
When using SharePoint, documents that have been opened are worked on in exactly the same way you would normally work on your documents in programmes such as Word, Excel, PowerPoint, Visio etc. On the normal menu bar at the top of each opened file is a feature called “Autosave” that is automatically turned ON. By clicking on the slide bar, you can set autosave OFF, but remember – while in the ON position, SharePoint is continually saving and syncing your work. And don’t forget, you can always go back to your version history if you decide against your changes!
Note: Your files are synced and stored on your organisation’s SharePoint system. It is best practice to regularly back up your SharePoint site, in line with your organisation’s Business Continuity plans, to a separate location in the unlikely event that your SharePoint system was not available. If you don’t know how to do this, you can ask your IT team, or call Vissensa for advice and guidance.
Where is the SharePoint recycle bin and how to recover a deleted SharePoint file?
The ability to delete files and folders is controlled at the main SharePoint menu – you’ll notice that once you select a file or folder, you can click on the familiar dustbin icon.
To recover a deleted SharePoint file (or folder), click the menu option to recover items from the Recycle Bin is present on the side bar of the SharePoint menu. Select an item, and click on the ‘Restore’ option in the menu bar which recovers files relatively easily to its original location and staff can do this themselves. The item will simply return to the original folder that it was deleted from, as denoted by the “Original Location” field that will be shown on the right hand side of the list display in the Recycle Bin.
Find out more about our Microsoft 365 Service today.